How to Upgrade Windows 7 to Windows 10 for Free Download Windows Media Creation Tool
How to Upgrade Windows 7 to Windows 10 for Free Download Windows Media Creation Tool
Windows 7 has been one of the most used and appreciated OS from Microsoft, even after the later upgrade to Windows 8. It is hailed as the flagship OS, and still has active users all over the world (ever after its end of support in 2015.)
However, since Microsoft has now completely stopped supporting Windows 7, the best thing that anyone with the old Windows on their system can do is, upgrade Windows 7 to Windows 10. The end of support means that there’s a high risk of errors and issues.
Talking about the problems, errors, and reasons to update Windows 7 to 10, here we share a few of them.
- A slow start in Windows 7
- No official support for Cortana in Windows 7
- Glitches while playing high-end games and videos
- No Microsoft Edge on Windows 7
- No top-grade data security in Windows 7
These were only a few of the problems and many others can also be added to the list. Thus, it would be best if you update Windows 7 to Windows 10.
Contents hide
How to upgrade from Windows 7 to Windows 10?
Upgrading to Windows 10 is pretty easy and straightforward. Just follow the steps mentioned in this article for an effortless switch.
- Fetch Windows 7 Key
The first thing that you need to do is find out the ‘Product Activation Key’ for Windows 7. You might have received it when you purchased Windows 7 for your computer. If you don’t have that then you can opt for product key finder tools to perform this task for you.
- Create a full backup of Windows 7:
With any upgrade, there are always chances of failure and data loss. Hence, to avoid such issues, you need to make sure of full backup of your system that can be used in such a case arises. Luckily for users, Windows 7 and Windows 8.1 have a tool called System Image Backup that easily and efficiently creates a backup of your computer. This way, you don’t have to depend on any third-party backup tools.
- Check Windows Activation
Before beginning to Windows 10 upgrade, you need to make sure that your Windows installation has been activated. To do so, simply right-click on My Computer icon on your desktop, and click on Properties. You’ll find a Windows Activation section, under that you can easily check the activation status. If it’s not activated, you can activate it by clicking on “Activate Windows Now.”

- Precautions
It is recommended to uninstall any software that might prevent a successful upgrade. They could be any old third-party applications, antivirus, or security software.
It would also be beneficial for you to disconnect any hardware devices connected to your PC, such as a printer, camera, external hard drive, and any other USB peripherals.
A step-by-step guide to upgrading from Windows 7 to Windows 10!
Step 1: Go to Microsoft.com and download the Windows 10 Media Creation Tool for your PC.
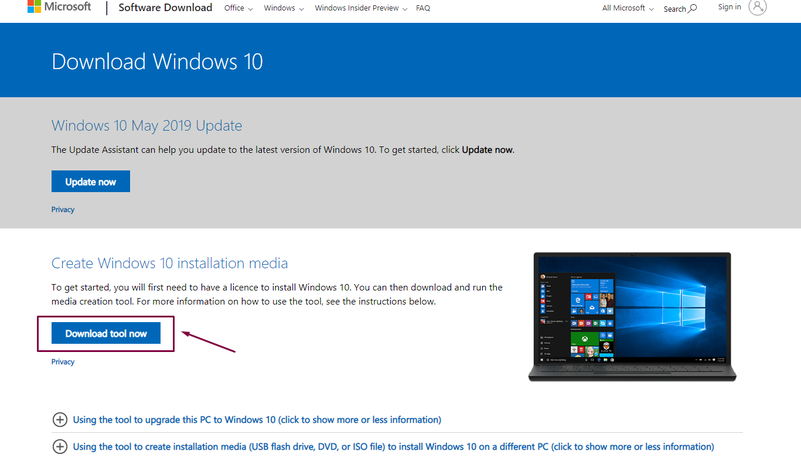
Step 2: To begin your Windows 10 upgrade, run this downloaded file. (it’s approximately 18 MB in size.)
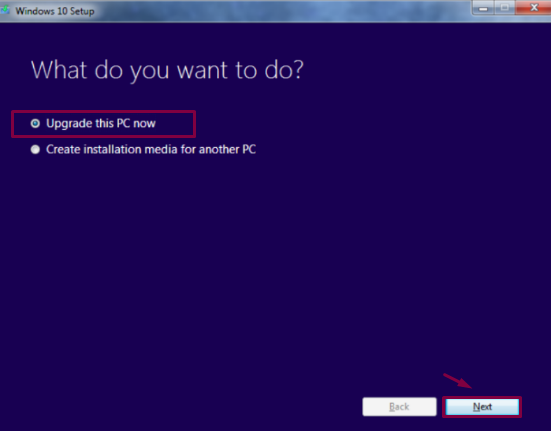
Step 3: You’ll see this screen asking you whether you want to- upgrade this PC or download for another PC. If you need an ISO image or Windows 10 on a bootable USB then choose the second option. Otherwise, choose first.
After you click Next, the Media Creation Tool will begin downloading files to your system. In this step, you’ll encounter a longer waiting time period as compared to other steps. You can, however, continue to use your PC in the meantime. But don’t close the download window.
After you click Next, the Media Creation Tool will begin downloading files to your system. In this step, you’ll encounter a longer waiting time period as compared to other steps. You can, however, continue to use your PC in the meantime. But don’t close the download window.
 Img src: Addictivetips
Step 4: After the necessary files are downloaded, just accept all the License terms (when prompted).
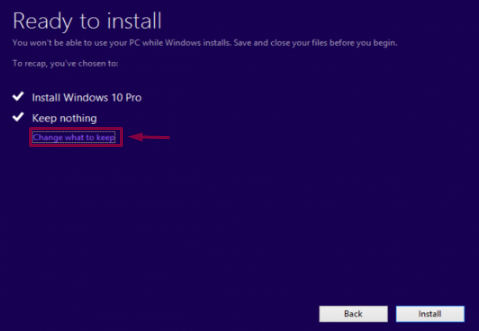
Step 5: Finally, you’ll be asked whether you want all your apps and files to stay intact during and after the upgrade. It keeps everything, by default. But if you want to customize your file storage, just click on the ‘Change what to keep’ option.
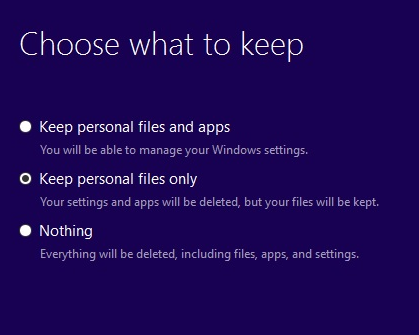
This tool has three options: keep personal files and apps, keep personal files only, and lastly, keep nothing. Take your pick from them, and click Next.
This tool has three options: keep personal files and apps, keep personal files only, and lastly, keep nothing. Take your pick from them, and click Next.
 Img src: Laptop Mag
 Img src: Microsoft Community
Step 6: After this next step, your PC will restart and that’s the last you will see of Windows 7 on your current system.
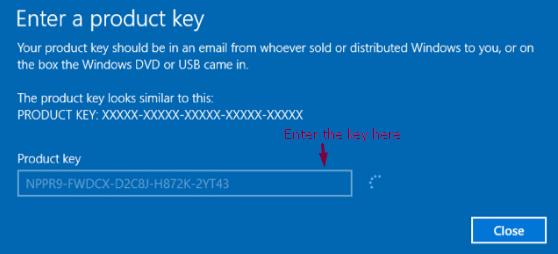
Note: After you run the Windows Media Creation Tool, you might get a dialog box stating that it needs a “key”. This happens when your Windows is not activated initially. Just enter the official registration key of your Windows 7 and move forward with other steps to upgrade to Windows 10.
Update your drivers for the new Windows:
After finishing with all the steps to install Windows 10 on your system, the next step is to make your system ready for the best and the most efficient functioning. You need to ensure that there are no instances of halts or app crashes during system use. But how


![[Guru Randhawa] Top 5 Best Ringtones 2018 | ये आपने पहले नही सुनी होगी ||](https://blogger.googleusercontent.com/img/b/R29vZ2xl/AVvXsEhFlVvfs9vWmhYnR1fYw08BIAUv8Vs3Kb8LO335Po1m6f1rgSEI7fvnRAmwI1OtLiJ52rV6eOVCfxxcfvl93sQayR_zcx17qNBf461ulXVgELf0hHUZn09gPV4lTjXxzv4OY7z1-Ww1ZLo/s72-c/20180805_161015.png)


Post a Comment